
What defines a Pelodaiko?
/I n my definition, a Pelodaiko is any drum made to be played by two
players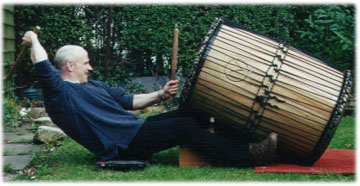 where
where
eac h of the players has an independently tunable playing surface. The
Construction and tuning methods used here for the Pelodaiko were as and Niko
agreed on for this barrel. The roping is a lot of work to install and to
maintain but is very pleasing both aesthetically and in terms of tunability.
Other options include using the bolt tuning system such as on a Punjabi Dhol or
a number of other means that give adjustable tension control over each side of
the instrument. Fixing the heads to the drum with nails as with a traditional
Daiko of this size means that it cannot be tuned and cannot be called a
Pelodaiko, not that taiko players or builders would wish to do so of
course.
Physical description Bushmills
Pelodaiko
 The Pelodaiko is
constructed from a white oak Bushmills whisky barrel, it stands 35″ tall and has
a playing head of 22″, at its entarsis (widest point) it is 24.5″. The playing
heads are rawhide which were de-fleshed, washed, shaved and soaked for fitting,
the heads have not been chemically treated, salted or exposed to any
preservative.
The heads are fitted to the drum using
a variation on an African method called the Mali weave. The drum was designed
to a scale similar to a Japanese Chu-Daiko, the medium sized drum of the taiko
family, but tensioned using a method taken from an African Djun Djun and with
tuning batter / reso options of a drumset tom tom.
The Sound
 Although designed around the approximate head
dimensions of a chu-daiko, the Pelodaiko is about a foot deeper. The extra
length delivers a more fully developed bass frequency. It shakes pictures off
the walls when played in a normal sized room.
In this prototype, both heads bear
different shaped bearing edges (the bit where the skin touches the barrel) to
experiment with a different timbre on each head, the drum produces a very
clearly defined fundamental plus a very wide range of overtones. Volume is
100dB-115dB. At an outdoor event it was reported to me to be audible with
rhythmic detail from over a half a mile away. Because of the large bass tone
underneath the main sound, it is nearly impossible to record the drum and
capture the full body of the sound. It was overdubbed but not
shown in this video
Construction details
The Shell / body of the
drum
 The shell is
constructed from a white oak Bushmills whisky barrel . When we received the
barrels they were of no more use to Bushmills. They were an
unappetising dirty brown /
colour as you can see from the picture. The barrels have
two lives, the first for making sherry in Spain and the second when they are
then bought by the whisky distillery for their fine product :). This is not to
be cheap, it is the charring and sherry that helps to give the whisky its golden
colour and unique taste.
 The ends were removed with a drill, a jig saw and a
large lever bar. If you like the smell of whisky, you’ll enjoy this 🙂 The
charring on the inside of the barrel was removed with a circular wire-brush on a
drill , it took a day. If you are at tempting work of this nature, you should
use protective eye-wear and close
fitting filter face mask, the soot is extremely fine ..
When the charring was removed and I’d
had several showers, the inside was washed and finally stabilised using diluted PVA. It was necessary to wait a
couple of weeks with the barrel a warm and dry place before progressing. The
wait will allow the residual spirit fumes to evaporate as well as allowing
excess moisture in the wood to escape. During this curing period the barrel
needed to be tightly bound with ratchets and webbing which were periodically
tightened to account for the wood shrinking slightly as it
dried.
 What
What
I should have done at this stage was to sand down the edges of each stave and to
have epoxied them together in their final position ( I glue
them now). I didn’t, I opted instead to use fiberglass matting &
resin to seal the entire inside of the drum. The result of this that on the
exterior of the drum the staves have continued to dry and have settled slightly
open (1-2mm). The interior of the drum is holding soundly.
To bring the surface back to the
beautiful underlying wood we initially used angle grinders with heavy duty
sandpaper attached, it takes a couple of passes around the shell to get most of
the surface relatively even and stain-free. We worked through different grades
of sandpaper starting at 60 grit down to 240 grit and eventually 00000 (5-Oh)
steel wool to smooth the exterior. Oak is a wood with a very open grain which
will ‘roughen up’ after sanding. When you start to apply the exterior finish it
will flatten and remain flat.
For the final finish on this drum,, I
used a household mixture of beeswax and caranuba furniture wax. I put at least
4 coats of this on the drum, each coat was buffed and then 00000 wire-wooled
before applying the next coat, I selected wax rather than a lacquer considering
that any impact or scratch damage received to the shell is much less
visually noticeable as well as
requiring only a straightforward re-application to the damaged area to restore
it. As I found out later, if there is a chance that the drum will be exposed to
rain, wax may not be the best solution, raindrops mark the wax and it is a real
pain to fix this when the drum is under tension. Next time I will probably use
varnish, oil or lacquer.
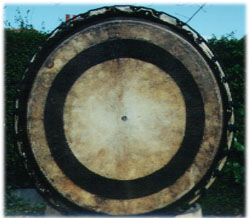
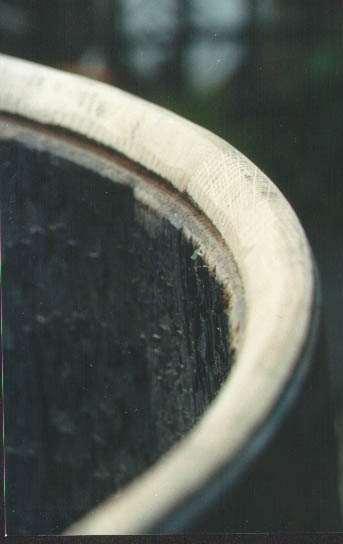 Bearing
edges
The bearing edge is a most critical
aspect affecting purity of tone from any drum. In the case of the Pelodaiko,
the edges were made absolutely level by a process of grinding on a slab as one
would with a djembe. When they were level they were shaped, this gives the
purity in the drum’s tone. On one side of the drum, the edge was cut to be
relatively flat with a shallow internal angle, this means that the skin touches
the edge more during it’s vibration and therefore this will give a slightly less
ringy tone with fewer overtones. On the second side of the drum (resonant side
when played by one player), the edge was cut more sharply to deliver a more
lively head. Because part of the intended playing style of the pelodaiko
involves playing directly on the bearing edges, it was important that although
they have a clearly defined edge, they also retain sufficient mass to withstand
impacts with substantial force using heavy 18″ long, 1″ thick hardwood sticks.
The edges are in the region of 0.5″ to 0.75″ thick.
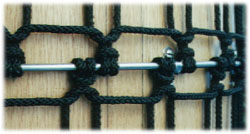
Tensioning
With this prototype, the heads are
applied using an adaptation of the African ‘Mali Weave’, a two-ring method. Each
head was wrapped around a 24″ diameter 6mm stainless steel (SS) ring and
criss-cross laced to itself across the drum to place tension on the head before
it is applied to the drum. This is positioned centrally over the bearing edge
with the spine line oriented as you will want to play it. A second SS ring which
has a slightly smaller diameter is fitted over the first, on top of the skin.
In the case of this drum, this ring has a 28 knots called ‘larks heads’
s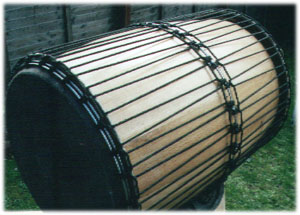 paced
paced
evenly around it and these knots form the tuning points similar to a lug point
on a drum kit counterhoop.
Although I used 6mm rings for flesh,
counter and central rings, I now recommend 8-10 mm. The 6mm rings have distorted
under the tension of a fully tuned drum.
The drum is unique because it employs
a fixed central ring on the drum, this could easily be a set of fixed individual
rings. The 26″ ring is fixed to the shell using SS fixings and SS screws. There
are 56 larks heads tied on this ring, 28 for each head.
 There are three main
reasons for using the central ring. Firstly, I wanted the two heads to be
independently tuneable thereby giving control over pitch at each head for when
2-players play the drum, secondly to utilise the phase relationships to control sustain and
movement of the tone (pitch bend). My third reason for using the central ring
was grounded in my concern that given its shape, the pressure on the barrel
under playing tension would expand the shell at its widest point. The ring is
only 12 millimetres larger then the shell at this point and the 6mm rope of the
central larks heads fits snugly against the shell thereby providing a shock
absorber and movement restrictor.
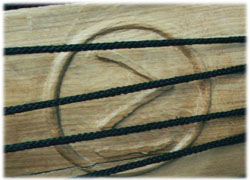
 The Mali weave
consists of a single rope vertically laced between the sets of larks heads on
the counter and central rings. When tuned, most of the tension is put on by
these vertical ropes. The same piece of rope goes around the drum to further
raise the tension by the insertion of ‘diamonds’. Because it is approximately
18″ from head to ring and 18″ back again and this length is required 28 times,
it needed approximately 30 metres of 6mm nylon low-stretch rope for each head’s
verticals and a further 2 metres for tuning. There will be quite a bit of rope
pulled through by the time you have it tuned. Any kind of pre-stretched rope
will save you back-breaking effort.
A low-medium amount of tension was put
on the drum initially while the skin stretched and began to dry. Tension is
applied by anchoring one end of the rope used for tying the verticals and
pulling tension between the top and central rings at each tuning point, working
around the drum. Slack is created which is transferred to each subsequent
vertical until you are back to the anchor point again, all the slack is pulled
through and it is tied off. This is a very tricky part of the procedure as you
need to be very careful to maintain even tension around the drum to stop the
skin being pulled to one side.
To use effort most effectively, I use
a Lambeg trick which is to go back 1/4 way around the drum, apply some tension,
working the excess back back to the end vertical and pull through the slack. Now
go back half way and do the same thing, then 3/4 way and finally from the start.
This is much easier than starting from vertical 1 but you still need to be
watchful of keeping the head level.
The day following the initial
application of the head, the skin was starting to become more rigid, I undid the
lacing across the top of the head, folded the skin back over the top ring larks
heads and trimmed it to fit. After a couple of days, when the head had started
to become raised in pitch by drying and tightening naturally, I started to
tension the drum properly. This is basically the same procedure as the initial
tensioning but each time you are putting increasing amounts of tension on the
skin and you can hear the pitch come up. (See Lambeg note above) This process
takes a lot of effort and is greatly helped by usng a length of dowel around
which the rope is wrapped to give a pulling handle and also by the use of vice
grips to stop the tension being pulled back into the drum. Gloves are a must!.
If you find yourself bouncing on the rope using your full weight to pull
tension through the drum you are getting towards the correct
tension.
The skin takes weeks of playing and
being stretched to settle and after a month I was putting in more vertical
tension twice per week. Once the drum has stabilised and you can’t pull any more slack through the
verticals. Then you will need to start tying diamonds. Once you find yourself
finishing your third row of diamonds it will be time to consider taking all the
diamonds out and re-tensioning the verticals again, depending on use and where
it is kept, this could be a year or so after construction when everything has
been seated and reached its final stretch position.
An annual tune up is a good idea and
you will be surprised at how much it has detuned, after a couple of years the
tuning settles
Tuning
This is a big drum and I find people
hitting it from up close and remarking about how highly tuned it is, yet when
they stand back when it is being played, they can’t believe the bass notes.
Taiko drums upon which the basic idea is founded are all under extreme tension
and have similar characteristics. My pet theory on this is that when tensioning
the drum you are actually lifting notes that are subsonic at lower tensions and
are bringing them into the audible spectrum. It is unfortunate for the player
that at all but low volumes, the drum is best appreciated from about 15-20 ft
away. I wouldn’t be afraid to put so much tension into the drum that you cannot
physically add any more, the skin is extraordinarily strong, much stronger than
commercial leather such as is found in shoes and clothing. Go for
it!
Heads
 The drum heads are
made from untreated rawhide, cowskin from a black animal. The heads were
selected, cut into 3ft diameter circles and then put through a fleshing process
(by the hide merchant) to remove most residual tissue from the underside of the
skin. When I got them home, I washed them thoroughly and shampooed the hair as
they smelt a bit ‘farmyardish’ (more than a bit actually :). I hung them in a
cool place for 24 hours to dry enough to shave but to be damp enough to be still
flexible. Shaving initially was with a pair of old hair shears that brought the
hair down to 3-4 mm all over and subsequent shaving was done with a wet shaver
when it was damp and penknife when almost dry. I highly recommend shaving the
hair off the playing regions. Do not play on a hairy bit before the head is 100%
dry, the hair will come off in lumps.
Skins can be stored by hanging them in
a warm dry place (such as a boiler house, although in warmer climes they can
just be draped over a fence outside) and they dry to a rock-hard consistency,
they can be stored in this state indefinitely for future use. If you are
buying cow hide for making drums you are advised to get them as fresh off the
animal as you can and before they have been subjected to any treatment such as
salting or any part of the tanning process.
Expect that the heads may last well in
excess of ten years if they have been reasonably well maintained and damage has
been avoided, you can not beat a hole in it, I promise.
Playing the drum
Sticks and beaters.
Because of the physical size of the
drum, it takes an impact from a pretty chunky stick to deliver the full tones.
The majority of the time the drum is played with hardwood sticks that are 1″ in
diameter and 18″ in length like a scaled-down version of the giant O-Daiko
sticks. It is important to select a hardwood for sticks that is not as hard as
oak and therefore the stick will break before the barrel does, I am evaluating
stick woods at the minute and will have them turned locally. Other methods can
be used too, such as the large felt and ‘fuzzy’ beaters that are used by
marching bands, each type of striking implement delivers a different tone. I am
also very pleased that the tipper and cane used for many of the playing
techniques for Ireland’s two main drums the Bodhran and the Lambeg are directly
transferable to the Pelodaiko, albeit with an interesting twist on the
sound.
Areas of the head
The drum delivers different tones
depending on which area of the head is struck, these are tones are available
from any quality drum in tune, however because of the scale involved with a
Pelodaiko, they are so much more apparent. Most playing is done a few inches
off centre, this delivers the fattest tone from the drum. As the player moves
out from the centre, you start to trigger increasing amounts of secondary and
ancillary tones which enrichen the drum. When the player plays out at the rim
there is a delicate sound that is beautiful for more intricate work. The head
can be damped with the finger when being struck to produce an harmonic and there
is a range of harmonics between the centre of the head and the rim, with a bit
of practice I’m confident one could play a melody line on it.
Mounting the drum
I have experimented with five main
positions for playing the drum
·  High Position : (1 or 2 players)
The drum is positioned with the lowest part of the playing surface at upper
chest height. The drummer stands facing the drum with one leg bent at the knee
(usually the left) and the other stretched out behind him. This gives the
leverage to be able to hit the drum and maintain balance. The drum can be
played by one person or by two, It is recommended that you do not play with your
thumb supporting the stick when playing 2-player style as the movement on your
drum head caused by the other player’s playing can rebound your stick and damage
or possibly break your thumb. You will find this clear when you play in this
mode.
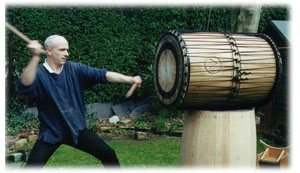
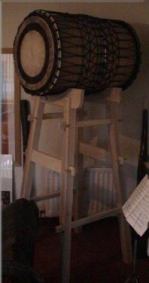
· Upright: (1 player) Pictured right. The standard ‘ensemble’
playing position is having the drum standing upright on a low flat stand 3-4″
tall that angles it slightly toward the player and allows the bottom head to
resonate freely. This position gives a slightly muted and more attack oriented
sound to the drum. The player stands square-on behind the drum with knees bent
to maintain balance as one would do in marital arts and is struck in a vertical
plane.
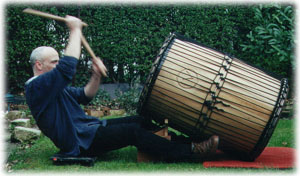 · Low position I (single player)image left. This is
one of the two most demanding positions for the player. the drum sits not quite
horizontally (i.e. with the heads almost vertical), one end on a support on the
floor and the other end is raised about 12″. The player sits on the ground with
his legs either side of the raised head of the drum and plays mid-crunch
style. The drum is almost totally free to resonate and delivers quality and
fullness of tone. I have played this style most and it is a wonderfully
responsive way of playing the drum but you need to work up to having the
abdominal strength to play for more than a few minutes.
· Low position 2 (1-2 players). This is the other
most demanding playing style. The drum is set absolutely horizontally about
9-12″ off the ground and both sides are played simultaneously. The players
adopt a similar style to the Taiko O-Daiko but much lower and more side-on. The
player stands left side (generally) on to the drum, left foot in line with and
to the side of the drum’s head. The left knee is bent so that the hips are at
around knee level. The right leg is kept straight and extends away from the
drum. When striking, the right stick moves horizontally insofar as is possible
and the left stick swings from either under the right armpit or from over the
right shoulder. This is a beautiful playing style to watch. The drum is
completely free to resonate.
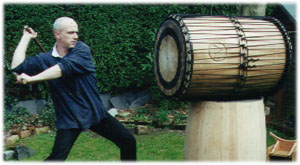 · Mid position (1-2 players) The drum is mounted
similarly to the above position but is raised about 2-3ft off the ground. the
playing methods is similar to the above but it is much less physically
demanding
Although they aren’t aware of this drum (yet :), I extend my appreciation
to the ‘Old Bushmills‘ whisky distillery
in Bushmills Co Antrim for making such wonderful pre-shaped drum shells
available. Without them, this project would not have been possible. Thank you
for this and for making great whisky (especially the 10 year old malt). I would
like to be able to construct a drum from a barrel the size of the oval one in
their visitors centre, only problem is that I couldn’t lift or store it until I
am better equipped. Watch this space, the day will come, I promise. I am also
on the look-out for smaller wooden barrels (I can’t remember the name) if you
can help with this, please let me know.
If you are considering building a Pelodaiko or if you would like
to have one built for you please contact
Paul. There are a number currently under construction around the world. If
you do make one, please send me photographs and I will display them here. If you
have learned any lessons from your project that you would care to share I would
be delighted to include them in this area of the site.
Coming next… the Bushmills Marimba –
In construction, watch this space